Search This Blog

Friday, December 31, 2010

More Stub Shaft; Brake Backing Plates

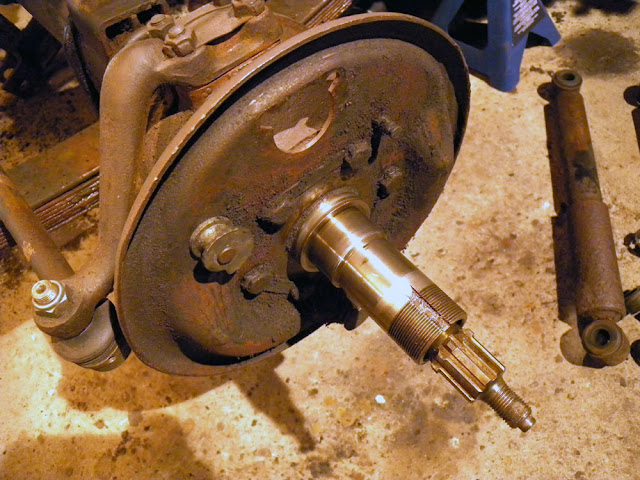
Good news about the stub shafts, they have been declared usable, and have cleaned up nicely.

The brake backing plates have also cleaned up pretty well. The bad news there is that the brake shoe pivot on one is loose (they should not move), and may be off-center on the other, most likely due to corrosion between the pivot and the plate. Given the importance of brakes, it may just be prudent to buy new backing plate assemblies.


Thursday, December 30, 2010

Broken Halfshafts; Stub Shafts

I think two new inboard halfshafts are in order, for the front axle! Both had inboard end damage, one being twisted and the other twisted right off completely. That answers some questions! Have ordered new ones....
 
The good news is that the stub shafts are in good shape, as are the universal joints. Have ordered two new Hardy Spicer uj's, however, as the swivel housing clearly hasn't had any oil in it for quite a while, and I can't be sure in what shape everything is inside the bearing caps.

Here's a view of the swivel housing opened up. The remains of the oil that was once in there can be seen, in a sort of droplet form. It comes right off, and there doesn't appear to be too much corrosion, but new swivel balls and Timken swivel bearings are going in there in any case.

You can't see it here, but with proper light it's possible to see the twisted off end of the halfshaft still in it's receiver end. We'll see what's up when the differential is removed. Here, you can see the outer race of the halfshaft bearing at the entrance to the axle tunnel. The gunk at the very bottom is just road grime yet to be cleaned off, with a bit of oil mixed in.

Stub axles are a mixed bag. One is clearly just fine, the spacer is in good shape as well. The other has some surface corrosion. I'll consult with those who know more than I do, and perhaps one or both will be replaced - although it would be nice to be able to keep them both.

A closer view of the corroded stub shaft. The non-corroded areas were under the hub bearing inner races.

Sunday, December 26, 2010

Steering Wheel Repainted

While waiting for a set of brass punches/drifts to arrive (which they say will be next week), in order to be able to install the new hub bearings without damaging them, it was time to finish up the steering wheel centre. Ended up using a high-temp (250 F) interior paint, just in case the sun on the steering wheel should get a little hot. The aluminum steering wheel centre received a self-etch primer, while the steel cover of the centre received a rust-converter primer. Haven't pushed the cover all the way in yet, in case it has to come off again.

Very tempting to put the leather cover on the unrestored outer part of the wheel, but given the amount of work left to do on the Land Rover, and the number of times the steering wheel may have to come off again, I am resisting!

The original bolts holding the steering wheel on cleaned up beautifully, and so they'll get used again. I intend to keep all original bolts on the vehicle wherever possible.

Seen here, the steering wheel itself is sitting on the cleaned, sanded and primered floorboards, which, along with all other parts to eventually be painted Pastel Green, are going to be stored in primer coat only until the green can be applied to all parts which need to be that colour.

Monday, December 20, 2010

More Bearings; Old Shock Absorbers

Christmas cookies? Nope, just the old bearings, nuts and lock washers in a cookie tin, with the two cleaned-up outer hubs. Managed to get three out of the four outer races out of the hubs without problem, but the fourth was really wedged in there. Took a lot of strong coaxing, so much so that the shift actually flaked at the end. The hubs are now ready for a deep clean, painting where appropriate, and all-new bearings. The bearings should be arriving from Atlantic British Ltd. any time now.

Just a view of what I assume are hub oil filler ports (diagonal hex-head screw). The screw caps were so deep in red paint and rock-hard dirt that at first I never thought I'd get them to work properly, but they do now.

After the hubs are done, the next parts to be done will be the brake backing plates, followed by the swivel balls.

Just out of curiosity, I put the bearing inner races temporarily back on the stub axle, to see how things go together.

Last but not least, the old shock absorbers have been removed, as have the old rubber axle buffers. The new shock absorbers are ready to install on the new chassis, just waiting for new washers, while the backing plates on the new buffers have a few scratches I'd like to paint/seal before installation. Note the condition of some of the old rubber bushings on the old absorbers. The axle buffers are soft and spongy and falling apart. All will be disposed of.


Wednesday, December 15, 2010

Bearings: Inner and Outer Front Hub cont'd

Rear oils seals off, and all inner races removed, revealed that all outer races are most likely in need of replacement, and so will put new bearings for all.

Here's a view of a corrosion pit in one of the outer races. All were different: one had as indicated below; one had discoloration and grooving; one had several gouges from possible a metal shard; and one had scratches.

Both hubs apart, with their bearing inner races aside. Next will be to remove the inner races, thoroughly clean the hubs, install new bearings, and then paint the hubs. After that, on to the swivel mounts.

Tuesday, December 14, 2010

Bearings: Inner and Outer Front Hub

Managed to get the temperature in the garage up to 10 C today, which is like summer compared to the -9 C (windchill -16 C) outside, thanks to a very good and inexpensive small radiant heater sold by Lee Valley. And so, off came the front hubs, for an inspection of the hubs and their inner and out bearings.

View of the inner end of the hub, with the oil seal over the bearing, which can just be seen underneath. Some small corrosion on the seal.

A view of the outer bearing, looking shiny and brand new.

The inner race of the bearing. The brown is just the coating of oil (the little there was left - I'm not sure it had been filled often in its lifetime). The rollers look in good shape, and all moves smoothly, so I'm hoping all is well. All four of the inner and outer bearings of both front hubs look like this. I can't see anything wrong, but will ask the experts to be sure.

Another view, not looking conical due to the camera lens....

A murky view of the inner race. No scarring or scratching, and so here again I am hoping all is well. The inner bearings weren't removed, as if they are in good condition there's no point in damaging the seals, etc..

Saturday, December 4, 2010

Radiator Painted; Steering Wheel Center

Managed to create a sufficiently warm 'micro-climate' in the garage to paint the radiator. Used Eastwood's Underhood Black Semi Gloss paint, as it will withstand higher temperatures (250 F). It went on easily and produced a nice finish. Haven't painted the radiator vanes, as they seem ok plus I'm not quite sure how to get the dirt off without damaging things, as they are made of a very thin and rather soft copper. Now, of course, the radiator cap looks bad! But I can live with that. :)


The steering wheel center round, after it's Evapo-Rust bath and some further cleaning and sanding smooth. Here's the inside, with the factory-applied black. I'd read somewhere that these parts had crackle-paint applied, but this center clearly had smooth paint on both inside and out. The chip at top is from where I had to hammer out a dent.

The outside. The surface corrosion (rust) remenants are very visible, but if you run your fingers over the surface it feels as smooth a silk. This will get a coat of rust converter as primer to neutralize any remaining rust, and perhaps a two-part epoxy primer as well, for longevity.


Wednesday, December 1, 2010

Steering Wheel Cleaning

 Nothing much to it: the paint was chipping off on its own accord, and a few minutes with a paint-removal-wheel on the drill took the rest off. The metal underneath was in excellent shape, and so I can only guess that perhaps a primer would have kept the paint on better - which is what will be done here when repainting. The center cover is presently having a rust-removal bath, due to surface rust. The plastic part will be left as is, although that could change. There's a nice leather cover for the wheel, but that will probably be the last thing to be installed on this project!

From whence it came. Note the heater hose at upper left - completely decayed after half a century.