
Monday, December 2, 2013
Jeep Colours
Thanks to the good folks at the website Bring a Trailer, I saw an advertisement for a 1946 Willys Jeep. Those colours looked familiar! According to the Jeep ad, the colours Harvest Tan with Sunset Red were a factory scheme for the CJ2A Jeep, and look a lot like the gold and red the Land Rover had been painted by the previous owner's neighbor sometime in the early 1980's. I wonder if that neighbor had seen a Jeep in these factory colours, and thought they might also work on a Land Rover? Could just be a coincidence, of course, but I thought it was worth showing here.

Wednesday, November 27, 2013
First Snow
... of 2013, that is, of course. Roads were bad, and so took daughter to school in the Land Rover, and afterwards took a small detour to enjoy the scenery. Things I note about this Land Rover on slippery surfaces: in two-wheel-drive, the vehicle handles not that well at all, slipping all over the place. Perhaps because it's relatively light. But put it in four-wheel-drive, it becomes a different beast, and handles very well and is a lot of fun to drive. Secondly, the windows rarely fog up. I had the small fan running, the one that had come with the vehicle and dating from the 40's or 50's, blowing across the windscreen, and despite the humidity and cold, the windows all remained clear. Thirdly, braking, which in normal conditions is adequate, really deteriorated, but it was impossible to tell if this was damp brake shoes or the very slippery surfaces.


Sunday, November 17, 2013
Departed Friend.
Just a little mention of my friend for 16 years, Bondi, who passed away last week. He was never happier than when in and around the Land Rover during the restoration, purring away, always appearing to be excited to be able to participate. He will be very much missed.


Saturday, November 16, 2013
Winter is Coming
...But not that quickly. A nice warm (10° C), calm, Fall late afternoon, great for a drive in the country.


Thursday, September 5, 2013
End-of-Summer Drive
Such a nice day: who could stay in at lunch?
For reasons that remain somehat of a mystery to me, this remains one of the most satisfying vehicles I've ever driven, and I've driven types from firetrucks to Porches to F2000 race cars. An ongoing enjoyable mystery.
(As usual, photos can be clicked upon to make them bigger if desired.)


For reasons that remain somehat of a mystery to me, this remains one of the most satisfying vehicles I've ever driven, and I've driven types from firetrucks to Porches to F2000 race cars. An ongoing enjoyable mystery.
(As usual, photos can be clicked upon to make them bigger if desired.)


Friday, July 19, 2013
Stormy Weather
One of those truly spectacular storm fronts came through today. Parked to watch, saw fine dust rising straight up from the fields in a cloud, before suddenly being blown sidways. Must have been quite the updraft in the storm cell. Got home to find tornado alerts posted everywhere.
The wide-angle photo looks a lot better if you click on it. Interesting light.

You can just see the rising dust in the background. I thought it was rain at first.

The wide-angle photo looks a lot better if you click on it. Interesting light.

You can just see the rising dust in the background. I thought it was rain at first.

Thursday, July 18, 2013
Birthday
Today is the Land Rover's 53rd birthday. Built July 18, 1960, in Solihull, England, and aside from the chassis and some replacement parts, is mostly completely original. Photo taken yesterday.


Friday, July 5, 2013
Wiper Update
I usually avoid driving the Land Rover in the rain, as I've heard how bad the old windshield wiper system is. Of course, there's been a couple of times when there have been a few raindrops, but nothing really needing wipers. Well, today we were caught in a proper rain shower, and so I switched on the wiper on my side - and it did a perfect job. No hesitation, and wiped the windscreen clear of rain, just as it should. I suppose I shouldn't really be surprised, but somehow was. The 52-year-old refurbished motor did a great job, and the new wiper blades cleaned off the rain as they're supposed to, visibility was great, and on we drove. Too bad the door tops were off and we got a little wet. :)
Caught in mid-sweep, by smartphone camera, as we pulled in. Rain was ending by this point, but still.....

Caught in mid-sweep, by smartphone camera, as we pulled in. Rain was ending by this point, but still.....

Monday, June 10, 2013
Two Land Rovers
We've become a two Land Rover family! This Discovery 2 will become my wife's daily driver once the lease runs out on her current car. The Disco was owned by a friend who is a professional British car restorer/technician, and the vehicle is in very good shape. Heated seats and full-time four wheel drive will be welcome in winter. It should be fun to get to know and maintain.


Monday, June 3, 2013
Small Details
Just posting a couple of small details, to help someone out on the S2C forum.
First, a factory installed (I believe) cylinder on one of the five 1959 rims, which I assume is a balance weight of some sort. If so, it doesn't say much for build tolerances back then!


Secondly, the position and shape of the engine hand crank handle hole in the front bumper. Horizontally, this is 25.5 inches from driver's-left end of bumper, 34.5 inches from driver's right (that is, looking forward). I don't know how uniform all bumper overall sizes are, but this is how it works out on mine.

Friday, May 31, 2013
Sunshine
Land Rover waiting patiently in the sunshine today, during an outing to hear my daughter sing at a senior's residence....
The windscreen frame always looks a little brown in photos, whereas it doesn't in real life. I don't know why.

The windscreen frame always looks a little brown in photos, whereas it doesn't in real life. I don't know why.

Saturday, May 4, 2013
Spring Drive
Getting warmer! We went for a late afternoon drive, with the door tops off, and it was just perfect. More and more wildlife appearing, too. Leaves just starting to appear on the trees. Another week or so and it will begin to look like summer.


(As ever, you can click on the photos to see them full size)


Friday, April 26, 2013
Middle Seat Belt
First, let me just underline I'm not a safety restraint expert. What follows is my own design, pure and simple. I am not an engineer. It hasn't been tested under extreme load (and hopefully never will, if you know what I mean).
This setup is also designed purely for Land Rovers with a spare tire attached to the tub's forward bulkhead by the standard original steel spare tire bracket. As well, I believe a knobby tire such as the ones on my vehicle should also be the only type used, as it helps prevent the belt slipping sideways.
I wanted a seat belt for the center seat that had a shoulder strap. For this middle seat, there appears to be only lap belts kits available. A lap belt does not prevent a passenger's head from contacting the metal dashboard in the event of a substantial frontal collision.
Also wanted was something that would not require modifying the Land Rover, beyond the existing seat belt anchor brackets and plates that I've already installed. Keeping this vehicle as unaltered from the original as possible has always been a priority, except where absolutely necessary.
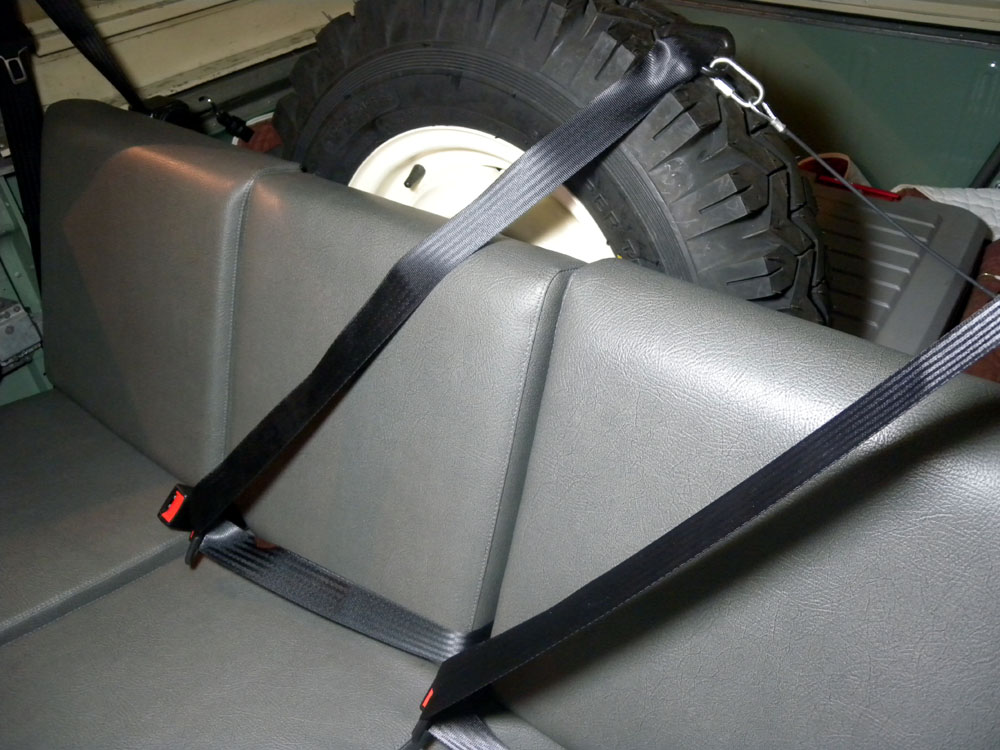
The following is what I've come up with. It's a standard shoulder harness set (from Land Rover), in this case with the retracting spool attached to the very sturdy spare tire bracket, and with the shoulder strap passing upwards and over the spare tire. The tire acts as the support to make sure the belt falls correctly across a person's chest. To prevent the belt from slipping sideways over the top of the tire under a forward load (this slipping might be hard to do under impact in any case, as the large treads act as very effective place-holding channels), the triangular slotted belt holder that is a part of the assembly (the part attached to the hard-top sides on the other belts) is held by a cable which in turn is attached to the steel capping on the side of the tub. The cable and it's fittings are stated as being capable of withstanding 2000 lbs of pull, but as they serve only to help prevent the shoulder strap moving sideways they shouldn't be taking much impact load at all.
The retracting/locking spool, at the center of the spare tire, is tightly anchored in the vertical position, as it has to be in order to work properly.
Below, the seat belts, with the center belt stowed.

Center belt connected. The belt falls across the chest of a passenger right where it should, even for taller children (those too large/old for car-seats and booster seats), and is even adjustable if necessary. The curve over the tire is a little low for the shoulder of a taller-than-average person, and in an impact would force the shoulder down, but in this case I believe it's better than no shoulder belt at all. This arrangement also works with a child's booster seat.

At the top of the spare tire, the connector and cable holding the belt at the angle. Driver's belt is connected to show the comparative angle.


At some point, in the interest of having some sort of rear impact protection, it would also be good to find a way to have head-rests installed (without changing the seat style). I'll have to work on that. At a stretch,for the time being a shorter person in the middle seat at least has a somewhat soft tire behind their head in the event of a rear impact.
This setup is also designed purely for Land Rovers with a spare tire attached to the tub's forward bulkhead by the standard original steel spare tire bracket. As well, I believe a knobby tire such as the ones on my vehicle should also be the only type used, as it helps prevent the belt slipping sideways.
I wanted a seat belt for the center seat that had a shoulder strap. For this middle seat, there appears to be only lap belts kits available. A lap belt does not prevent a passenger's head from contacting the metal dashboard in the event of a substantial frontal collision.
Also wanted was something that would not require modifying the Land Rover, beyond the existing seat belt anchor brackets and plates that I've already installed. Keeping this vehicle as unaltered from the original as possible has always been a priority, except where absolutely necessary.
The following is what I've come up with. It's a standard shoulder harness set (from Land Rover), in this case with the retracting spool attached to the very sturdy spare tire bracket, and with the shoulder strap passing upwards and over the spare tire. The tire acts as the support to make sure the belt falls correctly across a person's chest. To prevent the belt from slipping sideways over the top of the tire under a forward load (this slipping might be hard to do under impact in any case, as the large treads act as very effective place-holding channels), the triangular slotted belt holder that is a part of the assembly (the part attached to the hard-top sides on the other belts) is held by a cable which in turn is attached to the steel capping on the side of the tub. The cable and it's fittings are stated as being capable of withstanding 2000 lbs of pull, but as they serve only to help prevent the shoulder strap moving sideways they shouldn't be taking much impact load at all.
The retracting/locking spool, at the center of the spare tire, is tightly anchored in the vertical position, as it has to be in order to work properly.
Below, the seat belts, with the center belt stowed.

Center belt connected. The belt falls across the chest of a passenger right where it should, even for taller children (those too large/old for car-seats and booster seats), and is even adjustable if necessary. The curve over the tire is a little low for the shoulder of a taller-than-average person, and in an impact would force the shoulder down, but in this case I believe it's better than no shoulder belt at all. This arrangement also works with a child's booster seat.

At the top of the spare tire, the connector and cable holding the belt at the angle. Driver's belt is connected to show the comparative angle.
Rear view: Cable attached to tub, and the retracting/locking spool at the center of the spare tire.

At some point, in the interest of having some sort of rear impact protection, it would also be good to find a way to have head-rests installed (without changing the seat style). I'll have to work on that. At a stretch,for the time being a shorter person in the middle seat at least has a somewhat soft tire behind their head in the event of a rear impact.
Tuesday, April 23, 2013
Fame! : )
Well, not quite. Spotted this. : ) Always glad the blog has some use, somewhere. It started as a way to share photos of areas I couldn't find photos of when I was doing my own restoration, and any tips that might be useful, but I admit it's gotten out of hand and become more of a diary of sorts.... The search box at the top of the page makes it easier to find anything that might be technically useful, however (I hope).


Wednesday, April 17, 2013
Spring has Sprung
The season, that is, not a part of the suspension....
Beautiful Spring day, went for a nice long drive at lunch. The odometer now reads just five shy of 1000 miles (or some 1600 kilometers) since the restoration was basically completed at the beginning of last year. The Land Rover was happy to be out in the still-cool air, and would have roared along at 80-90 kph all day long if I hadn't had to go back to work.
Below: Zooming along, with very little traffic.

On the way back, stopped at daughter's school as it was lunchtime and I knew they'd be outside. Lots of waves and shouts and smiles from the whole playground (almost everyone, including the teachers, already knows the vehicle by sight - not a lot around!). I passed the camera over, and someone snapped this pic of myself and daughter, plus her friend Aurelie. What you can't see is the crowd behind the camera, with whom I am pleading not to drop the aforesaid camera.... : )

Not looking too bad after a great winter of driving. Radiator muff rolled down. If the warmer temperatures keep up, the muff can come off soon.


Thursday, March 28, 2013
Wide Angle
Just an atmospheric wide-angle shot of driving, taken by a friend. Thought it looked kind of nice, and does give the feeling of cruising along on a winter's day.


Monday, March 11, 2013
Another Drive
This time a view from the outside, filmed by my friend Alex as I took his wife and my daughter for a drive. Good way to see that the brake lights and turn signals are all working correctly, as well!
Wednesday, February 13, 2013
Heater Follow-up
Went for a 10 mile drive today, 0 C. The modified heater hose doesn't leak, and so the fan shroud can go back on. I measured the surface temperature of the engine-heated hose above the heater immediately after returning, and it read 44 C. The heater alone had the temperature up to 41 C, so pretty close. Before starting, the engine block itself (where the coolant is) was nice and warm to the touch, right to the back.


Tuesday, February 12, 2013
Radiator Lower Hose Heater
(To see a follow up to this installation, six years later, see here)
As part of the idea to give the engine as easy a life as possible during the winter months, especially when it's below -10 C, today I installed a Temro 375 watt in-line lower radiator hose coolant heater. This should help get the engine up to operating temperatures sooner, helped along by the removable magnetic oil sump heater that has also been installed.
The hose heater is very easy to install. I think it took about 20 minutes in total, and that's including draining the system and cutting the hose to install the heater.
Pictured below, the basic kit, which I've installed on the radiator hose. Between the plastic box and the hose is the segment of hose removed to make way for the heater. The cap on the plug end is nice to have.

Another view of the installation. Very easy to do. Clamps came with the kit.

A view inside the element's plug.

Below: installed. There is adequate room, in fact it fits in the space just perfectly. The clamp screw is actually quite a ways from the engine casting, it's only the perspective that makes it look close. This view is with the radiator fan shroud removed, which had to be done for the installation. The gold-coloured fitting at left is the shroud bracket; at right is the radiator fan. The lower lip of the shroud comes very close to the heater cord, and so I've placed a 3" length of plastic wire protecting tube around the wire, to prevent wear.
The heater could have been placed the other way around, with the wire pointing down, but then access to the hose clamp screws would have been next to impossible if they need tightening at some point, plus I wanted the wire to come up to the same location where the battery trickle charger connects, so both can be unplugged at the same time.

Below, just a better view of the protective ribbed plastic cover. There hasn't been time to do a full test, but after half an hour plugged in, the surface of the heater element read 51 C, and the surface of the hose above the heater read 34 C. The kit indicates that the heater can be left on all night, but that turning it on 2 to 3 hours before the vehicle needs to be driven is usually adequate to heat things up.

Wednesday, January 30, 2013
Replacement Starter
The replacement starter arrived on Monday, and today it was installed. Works perfectly (as expected), and so if all goes well, there's just the exhaust heat shield and wing to replace, and then that's it.
A warm day today, 13 C, a welcome one-day exception to the cold, and made it even possible to work in the garage with the door open, which was really nice. Made running the engine that much more pleasant, as well. Tomorrow, it's back to -5 C and then -10 C by Saturday.
Below, new starter in place, and, as can be seen above the starter, have left the cord off of the old block heater. Shiny pipe in foreground is the exhaust.

Friday, January 25, 2013
Starter Failure; Block Heater
Went to go for a drive, on a brisk -10 C day. Engine started normally, and I let it warm up. Got in, put the vehicle in reverse, and then it stalled as I hadn't given enough fuel. Started again - and just as it the starter engaged, there was a metallic bang/clang and everything stopped dead.
I got out to see if the engine could still be turned over using the starter crank handle, but no, the engine wouldn't move. Something had broken. No amount of rocking the vehicle while in gear would free the flywheel.
Given that when trying the ignition button again, there was absolutely no noise from the starter itself, but the lights on the instrument panel went dim, it seemed likely that the starter had jammed the flywheel somehow. Either that, or something major had broken inside the engine. As the starter would likely need to come off in any case if the engine needed major repairs, removing the starter to see what was potentially wrong there seemed the logical first thing to do.
As the steering linkages were in the way, I elected to take the wing off, followed by the forward exhaust pipe and the exhaust heat shield. That way I could see clearly, too. Only difficulty was the -10 C temp in the garage. Even the shop hand cleaning lotion had frozen. (I have to say those front mudguards do a great job at stopping dirt etc., from accumulating on the bulkhead.)

With everything off, the starter was easy to remove. As it came out, it was plain that the spring, pinion, etc., were just floating on the shaft and everything slid off as the starter came out. Clearly the nut on the end of the shaft had come off. No visible damage to the flywheel, however, which was good to see. The engine turns over by hand as smoothly as ever.
In the photo below, the hole where the starter was. At the very back, it's possible to see where the spring, or something, on the shaft had contacted the bell housing, making a few gouges before everything jammed.

I managed to get everything out except the nut itself. A flexible magnet should take care of that. Below, the remains of the nut's threads still on the shaft. Shaft threads appear to be in pretty good shape. Split pin that held the nut in place was neatly cut each side where it comes out of the shaft.


While I was back there, I had a good look at the original block heater. It hasn't been tested. Cord just plugs in like any other appliance, although the rubber cover on the cord side had melted somewhat. I don't know why.

A slightly blurry view of the cord's socket.

I got out to see if the engine could still be turned over using the starter crank handle, but no, the engine wouldn't move. Something had broken. No amount of rocking the vehicle while in gear would free the flywheel.
Given that when trying the ignition button again, there was absolutely no noise from the starter itself, but the lights on the instrument panel went dim, it seemed likely that the starter had jammed the flywheel somehow. Either that, or something major had broken inside the engine. As the starter would likely need to come off in any case if the engine needed major repairs, removing the starter to see what was potentially wrong there seemed the logical first thing to do.
As the steering linkages were in the way, I elected to take the wing off, followed by the forward exhaust pipe and the exhaust heat shield. That way I could see clearly, too. Only difficulty was the -10 C temp in the garage. Even the shop hand cleaning lotion had frozen. (I have to say those front mudguards do a great job at stopping dirt etc., from accumulating on the bulkhead.)

With everything off, the starter was easy to remove. As it came out, it was plain that the spring, pinion, etc., were just floating on the shaft and everything slid off as the starter came out. Clearly the nut on the end of the shaft had come off. No visible damage to the flywheel, however, which was good to see. The engine turns over by hand as smoothly as ever.
In the photo below, the hole where the starter was. At the very back, it's possible to see where the spring, or something, on the shaft had contacted the bell housing, making a few gouges before everything jammed.

I managed to get everything out except the nut itself. A flexible magnet should take care of that. Below, the remains of the nut's threads still on the shaft. Shaft threads appear to be in pretty good shape. Split pin that held the nut in place was neatly cut each side where it comes out of the shaft.

The starter out. As I'm not sure what kind of damage may have been done to the shaft or the internals of the starter, I have ordered a re-built unit from 3 Brothers Classic Rovers.

While I was back there, I had a good look at the original block heater. It hasn't been tested. Cord just plugs in like any other appliance, although the rubber cover on the cord side had melted somewhat. I don't know why.

A slightly blurry view of the cord's socket.

Tuesday, January 15, 2013
January
I know, I probably post too many photos of the Land Rover. : )
Anyway, took a nice long drive at lunch, temperature just at 0 C, most of snow melted for now, but at least some of the river is still frozen. But no worries, lots more winter to come.
(As ever, best view of the photo is when clicked.)

Anyway, took a nice long drive at lunch, temperature just at 0 C, most of snow melted for now, but at least some of the river is still frozen. But no worries, lots more winter to come.
(As ever, best view of the photo is when clicked.)

Monday, January 7, 2013
Some Dramatic Advertising
A rather amusingly dramatic advert for Land Rover. The header says 1969, but the Land Rover featured is clearly a Series 3, which were produced from 1972 to 1984.
Thursday, January 3, 2013
Twilight Drive
-9 C, gently snowing, evening falling: perfect time for a drive. And, incidentally, the first drive of 2013.
If you like, for a nicer sense of the 'atmosphere', you can click on the photos to see them full-size.


If you like, for a nicer sense of the 'atmosphere', you can click on the photos to see them full-size.


Subscribe to:
Posts (Atom)