Oil seals for the front axle arrived here just 48 hours after placing the order with 3 Brothers Classic Rovers - which is typical of their truly excellent service.
Getting the proshaft bolts off proved to be a struggle, but they were eventually removed. They were all seized, and the awkward spaces around them makes getting tools in there difficult. Even the special prop shaft tool I had purchased didn't help, as it was blocked slightly by the yolks. On top of that, the prop shaft wanted to turn a little, making trying to turn the nuts frustrating, even with the rear wheels on the ground (in 4wd). After struggling with every approach I could think of, I ended up searching on the Rover forums at the options others have tried. I settled on 1: used a trusty 24" pipe wrench to immobilize the prop shaft; and 2: drilled a large hole in the side of the nuts, and then split them with a cold chisel. An easy process, it turned out, not taking too much effort or time. Of the four nuts nearest the front axle, one nut was already loose, two were drilled and spilt, and the last surrendered after being drilled only. The nuts themselves were very soft, and had rounded off immediately; don't think they were original. This thought was reinforced by the discovery that the four bolts were inappropriate for the prop shaft.
The four bolts on the right are those from the prop shaft at the front axle. The bolt at left is from the end at the gear box, and is the correct type (at least it has a shank, if not).
Prop shaft hangs its head in defeat. : )
A view of the front axle 'production line'. Everything here is just waiting for cleaning and/or paint, and then is ready to be then be reassembled (once the axle itself is off, cleaned and inspected). All the new bearing races, etc., are in place (except one bearing, which I damaged today while installing. Argh!) Lower left: Swivel assemblies; On the right: windshield under wraps (at top), and then the halfshafts, hubs and then brake backplate parts. Steering arms are just visible. The white cover is protecting the new chassis.
This is just a simple pictorial history of my restoration of an original Canadian-import 1960 Land Rover Series 2 88" (or SWB - Short Wheel Base), LHD (Left Hand Drive) which I purchased in August, 2010. Later posts include photos of some of the things I've done with the vehicle since its restoration was essentially completed, although repairs and other maintenance are obviously an ongoing process. Words in orange are links. Click the photos to make them full size. Search using box below.
Search This Blog
Friday, January 21, 2011
Tuesday, January 18, 2011
Swivel Hubs Disassembled
Today's after-work project was to take apart the swivel hubs and inspect the parts. They came apart with no trouble, and the revealed parts showed surprisingly little corrosion or damage. The swivel balls did have some fairly deep corrosion on the polished surface, but only around where the oil seals sit, and could probably be repaired at some point and kept as spares. The interiors had no corrosion at all. The swivel bearings and pins are in good shape, in spite of not having bathed in oil in quite a while, but do have enough small damage from corrosion (and perhaps impacts) that they warrant replacing. I'm glad I didn't try to fill the hubs and swivel assemblies with oil, as it would just have leaked out quite rapidly: the swivel ball oil seals were all substantially damaged or worn.
This view shows one of the swivel assemblies, with bolts and sub-assembly parts bagged. That's the old swivel ball at the top; plus the old oil seal at bottom right, dented and perforated.
A view of the axle casing end, with the oil seal still in place, and needing the old gasket scraped off. Still a little oil in there! I'll have to order new oil seals.
This view shows one of the swivel assemblies, with bolts and sub-assembly parts bagged. That's the old swivel ball at the top; plus the old oil seal at bottom right, dented and perforated.
A view of the axle casing end, with the oil seal still in place, and needing the old gasket scraped off. Still a little oil in there! I'll have to order new oil seals.
Sunday, January 16, 2011
Halfshafts Assembled
Thanks to the new shop press, assembly of the halfshafts was relatively easy. Relatively, because halfshafts are somewhat heavy, and maneouvring them in the press to put in the universal joints, for instance, was interesting. Spacers, bearing races and bearing retaining collars all went on their respective inner halfshafts smoothly, and the universal joints were slightly tricky but aside from having to reset the bearing rollers in one cap, all went well. So, that's one set of sub-assemblies done. Next it will be the turn of the swivel ball assemblies.
Thursday, January 13, 2011
Halfshafts
The new inner halfshafts arrived from Blanchard today, so it looks as if everything is now here. The two inner halfshafts looked in bad shape when unwrapped, the longer being encrusted in ancient dirt and the shorter having a thick coat of what appeared to be soft black paint or a protective layer of some sort. The paint was so thick in the splines that I thought they had been worn down. However, degreaser and a few passes of the brass wire wheel later, they came out looking like new, and the good Hardy Spicer shafts that they are.
I have now sourced an inexpensive press, which will make bearing and spacer installation much easier over the course of the restoration, and so will wait a few days to see how the press appears in reality before perhaps obtaining one and using that to put the halfshafts together.
Wednesday, January 12, 2011
Brake Backing Plates; UJ's; Swivel Balls
Parts are trickling in for the axle rebuild. The new Girling brake backing plates (on the right, obviously) look great. Nice to have anodized units, but they have been around long enough that there are small rust spots here and there. Easy to clean up, however, and they'll get the rust-prevention treatment.
Apparently the loose brake-shoe swivels were a known problem, as these new ones are welded in.
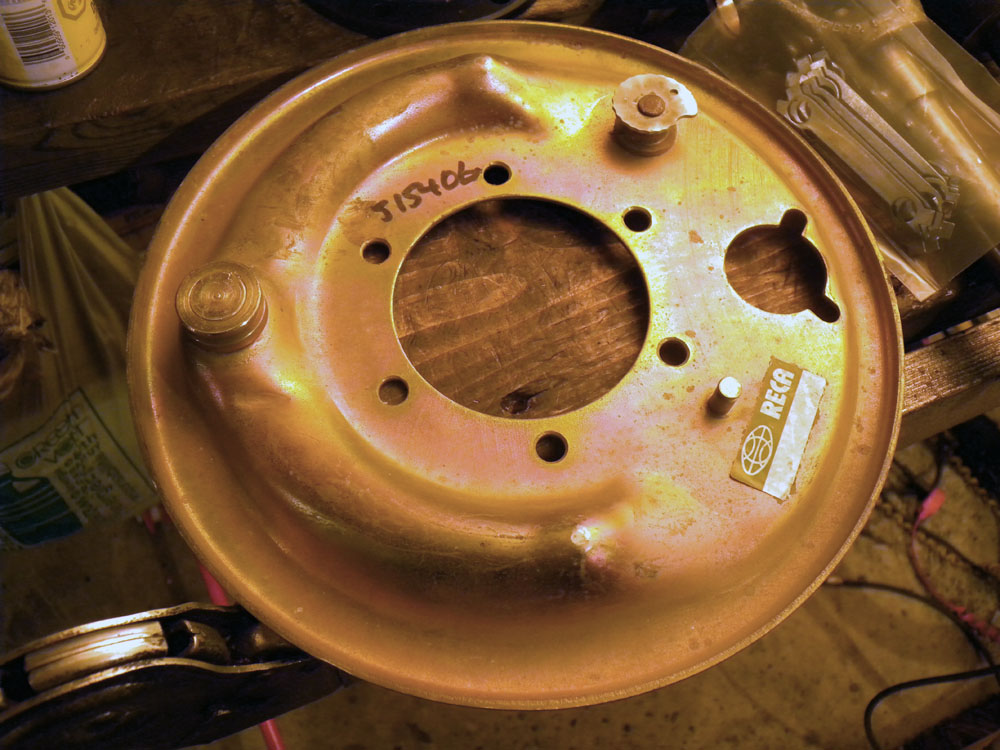
A view of the brake-pad side. As the Girling plates come with brake adjusters installed, the adjuster kits I purchased earlier will be relegated to spares. I have no idea who RECA is; these came from Rovers Down South, in New Orleans.
The new universal joints arrived recently, as well. Haven't heard of GKN before, but as they have Hardy Spicer among the companies shown on the box, plus impressive info on their website, and are listed as Hardy Spicer by LRSeries, from whom these were purchased, I imagine they are good replacements. An original Hardy Spicer uj is on the right (minus two caps), next to an outer halfshaft. The new inner halfshafts are due to arrive from Blanchards any day now.
Also received the new Timken bearings for the swivel balls. Won't be long, I hope, before everything starts getting put together.
Apparently the loose brake-shoe swivels were a known problem, as these new ones are welded in.
A view of the brake-pad side. As the Girling plates come with brake adjusters installed, the adjuster kits I purchased earlier will be relegated to spares. I have no idea who RECA is; these came from Rovers Down South, in New Orleans.
The new universal joints arrived recently, as well. Haven't heard of GKN before, but as they have Hardy Spicer among the companies shown on the box, plus impressive info on their website, and are listed as Hardy Spicer by LRSeries, from whom these were purchased, I imagine they are good replacements. An original Hardy Spicer uj is on the right (minus two caps), next to an outer halfshaft. The new inner halfshafts are due to arrive from Blanchards any day now.
Also received the new Timken bearings for the swivel balls. Won't be long, I hope, before everything starts getting put together.
Friday, December 31, 2010
More Stub Shaft; Brake Backing Plates
Good news about the stub shafts, they have been declared usable, and have cleaned up nicely.
The brake backing plates have also cleaned up pretty well. The bad news there is that the brake shoe pivot on one is loose (they should not move), and may be off-center on the other, most likely due to corrosion between the pivot and the plate. Given the importance of brakes, it may just be prudent to buy new backing plate assemblies.
Thursday, December 30, 2010
Broken Halfshafts; Stub Shafts
I think two new inboard halfshafts are in order, for the front axle! Both had inboard end damage, one being twisted and the other twisted right off completely. That answers some questions! Have ordered new ones....
The good news is that the stub shafts are in good shape, as are the universal joints. Have ordered two new Hardy Spicer uj's, however, as the swivel housing clearly hasn't had any oil in it for quite a while, and I can't be sure in what shape everything is inside the bearing caps.
Here's a view of the swivel housing opened up. The remains of the oil that was once in there can be seen, in a sort of droplet form. It comes right off, and there doesn't appear to be too much corrosion, but new swivel balls and Timken swivel bearings are going in there in any case.
You can't see it here, but with proper light it's possible to see the twisted off end of the halfshaft still in it's receiver end. We'll see what's up when the differential is removed. Here, you can see the outer race of the halfshaft bearing at the entrance to the axle tunnel. The gunk at the very bottom is just road grime yet to be cleaned off, with a bit of oil mixed in.
Stub axles are a mixed bag. One is clearly just fine, the spacer is in good shape as well. The other has some surface corrosion. I'll consult with those who know more than I do, and perhaps one or both will be replaced - although it would be nice to be able to keep them both.
A closer view of the corroded stub shaft. The non-corroded areas were under the hub bearing inner races.
The good news is that the stub shafts are in good shape, as are the universal joints. Have ordered two new Hardy Spicer uj's, however, as the swivel housing clearly hasn't had any oil in it for quite a while, and I can't be sure in what shape everything is inside the bearing caps.
Here's a view of the swivel housing opened up. The remains of the oil that was once in there can be seen, in a sort of droplet form. It comes right off, and there doesn't appear to be too much corrosion, but new swivel balls and Timken swivel bearings are going in there in any case.
You can't see it here, but with proper light it's possible to see the twisted off end of the halfshaft still in it's receiver end. We'll see what's up when the differential is removed. Here, you can see the outer race of the halfshaft bearing at the entrance to the axle tunnel. The gunk at the very bottom is just road grime yet to be cleaned off, with a bit of oil mixed in.
Stub axles are a mixed bag. One is clearly just fine, the spacer is in good shape as well. The other has some surface corrosion. I'll consult with those who know more than I do, and perhaps one or both will be replaced - although it would be nice to be able to keep them both.
A closer view of the corroded stub shaft. The non-corroded areas were under the hub bearing inner races.
Subscribe to:
Posts (Atom)