Took the morning off and went to Ottawa this morning to fetch the wheels. PrepTech did a really nice job. I didn't think they'd be able to 'retrieve' the stampings on a couple of the more surface-rusted wheels, but they did. Very nice work. It also reveiled that perhaps there was more than one type of wheel supplier in 1960. Four of the wheels have three stampings, namely the "S" in a diamond; the year they were made ("/59"); plus the part number ("231601"). One wheel, however, just has the part number, in a small font.
Looking good!
The stamping fully revealed (only legible on a single wheel previously):
Also tested the thermostat, by immersing it in hot water as per the workshop manual. Nice to see the bellows open at exactly the correct temperature (168 F) and be fully open by the stated temperature (193 F) as well. The other item here (at left) is the thermostat switch for the mixture warning light.
This is just a simple pictorial history of my restoration of an original Canadian-import 1960 Land Rover Series 2 88" (or SWB - Short Wheel Base), LHD (Left Hand Drive) which I purchased in August, 2010. Later posts include photos of some of the things I've done with the vehicle since its restoration was essentially completed, although repairs and other maintenance are obviously an ongoing process. Words in orange are links. Click the photos to make them full size. Search using box below.
Search This Blog
Tuesday, April 5, 2011
Saturday, April 2, 2011
Engine Cleaning
Have begun preparing to remove the engine, by removing the ancillaries such as the dynamo and starter, and beginning to clean the block. A lot of dirt there! Have also begun looking for paint for the engine. Fortunately there are some quite pristine areas underneath the grime, and have been using Photoshop to generate paint colours and then testing them against the existing original paint, so that a paint shop can mix the correct colour. First experiments today with a mix were not sucessful, as the paint did not dry the colour the shop said it would, but thanks to the experts at 3 Brothers Classic Landrovers I have a new (and less expensive) lead to try. Will get to that this weekend, as I would like to get the engine painted and onto the other chassis as soon as possible. Not planning to open the engine up, unless I see leaks or something to warrant it once the engine runs again.
In this view, the cleaning is coming along, but there's a lot to do. Note the duck-egg green paint of the water pump, as opposed to the grey of the rest of the engine. Probably a replacement part from a later model.
On the left, the grime, and on the right, what the block looks like after a lot of scrubbing! Paint is almost like new. Note the numbers - there are a lot of numbers and letters on the engine - I'll note them all down, just out of interest.
Things removed from the engine, plus the steering box and upright supports for the bulkhead and steering box. Starter cover is going to need some tlc....
Have repainted the exhaust manifold a slightly darker shade. Once it's fully cured in 7 days, it'll go through a baking process to harden the paint.
In this view, the cleaning is coming along, but there's a lot to do. Note the duck-egg green paint of the water pump, as opposed to the grey of the rest of the engine. Probably a replacement part from a later model.
On the left, the grime, and on the right, what the block looks like after a lot of scrubbing! Paint is almost like new. Note the numbers - there are a lot of numbers and letters on the engine - I'll note them all down, just out of interest.

Things removed from the engine, plus the steering box and upright supports for the bulkhead and steering box. Starter cover is going to need some tlc....
Have repainted the exhaust manifold a slightly darker shade. Once it's fully cured in 7 days, it'll go through a baking process to harden the paint.
Tuesday, March 29, 2011
Turn Indicator
Opened up the turn indicator, partly to clean and partly to see how it works. I have read somewhere that it may be of the self-cancelling type, but although I don't quite understand the design, I can't see the spring in there being strong enough to do anything. The contact mover that moves with the handle to turn the indicators on and off is quite stiff, and I can't see the spring overcoming that, even when new. However, there is definitely something more to the design, what with the cam and adjuster screw on the backsideof the housing. Anyway, everything was cleaned and lubricated, and as a manual on/off type switch it should work well.
Will clean the panel itself closer to re-installment time. The green plastic outer lens of the turn indicator light is fractured, but I'm hoping glue and some polishing will help. The yellow pull on/off switch, for the dome light, has "Made in the USA" stamped on the inner box, and so I don't think it's a factory option; more likely installed by the dealer in Toronto. Also, the hole in the panel isn't as neat as that for the turn indicator and light.
Friday, March 25, 2011
Bulkhead Off; Exhaust Manifold
Took surprizingly little time and no trouble to get the bulkhead off, using the engine hoist. I don't know why I expected it to be more complicated! And of course, once it was off, all that new dirt and grime was revealed, but that's to be expected. Lots of part cleaning and painting coming up!
Overview of the project area. It now feels as if there's a lot more room. That feeling, however, I think will disappear when the new bulkhead arrives.
Two view of the engine and gearbox, with something like 51 years of grime attached. The wiring harness, being fabric covered, has absorbed a lot of oil and dirt and is rotting everywhere. The new harness should take care of that.
Never thought I'd have two Land Rover chassis' in the garage. : )
An unusual view of a Land Rover?
The exhaust manifold had two very hard to remove bolts, due to being rusted solid and in difficult to reach places, but perserverance, a drill and a cold chisel eventually won out. At top, the intake manifold; centre, the new exhaust manifold; at bottom, the goose-neck exhaust manifold. I think I may paint the new manifold, as that shiny silver is a bit much.
Can't quite understand the use of what must have been a cable operated valve in the manifold. It has a spring, and so I gather use was temporary, but why would one want to cut off exhaust flow?
EDIT: This from 'athorpe' of the S2C Club: "It was to direct the exhaust to the base of the inlet manifold to heat it, when the engine is warm it diverts it down the exhaust pipe, so its only restricted when cold. The spring is a bi-metalic one, so does the above when hot and cold ." Voila.
Overview of the project area. It now feels as if there's a lot more room. That feeling, however, I think will disappear when the new bulkhead arrives.
Two view of the engine and gearbox, with something like 51 years of grime attached. The wiring harness, being fabric covered, has absorbed a lot of oil and dirt and is rotting everywhere. The new harness should take care of that.
Never thought I'd have two Land Rover chassis' in the garage. : )
An unusual view of a Land Rover?
The exhaust manifold had two very hard to remove bolts, due to being rusted solid and in difficult to reach places, but perserverance, a drill and a cold chisel eventually won out. At top, the intake manifold; centre, the new exhaust manifold; at bottom, the goose-neck exhaust manifold. I think I may paint the new manifold, as that shiny silver is a bit much.
Can't quite understand the use of what must have been a cable operated valve in the manifold. It has a spring, and so I gather use was temporary, but why would one want to cut off exhaust flow?
EDIT: This from 'athorpe' of the S2C Club: "It was to direct the exhaust to the base of the inlet manifold to heat it, when the engine is warm it diverts it down the exhaust pipe, so its only restricted when cold. The spring is a bi-metalic one, so does the above when hot and cold ." Voila.
Wednesday, March 23, 2011
Bulkhead Ready to Come Off.
Finished stripping the old bulkhead tonight, and it's now being held in place just by the two main bolts (nuts are off), and is leaning against the one remaining support bracket. It will be off soon.
Just a few of the things liberated from behind the instrument panels. Nothing of value unfortunately!
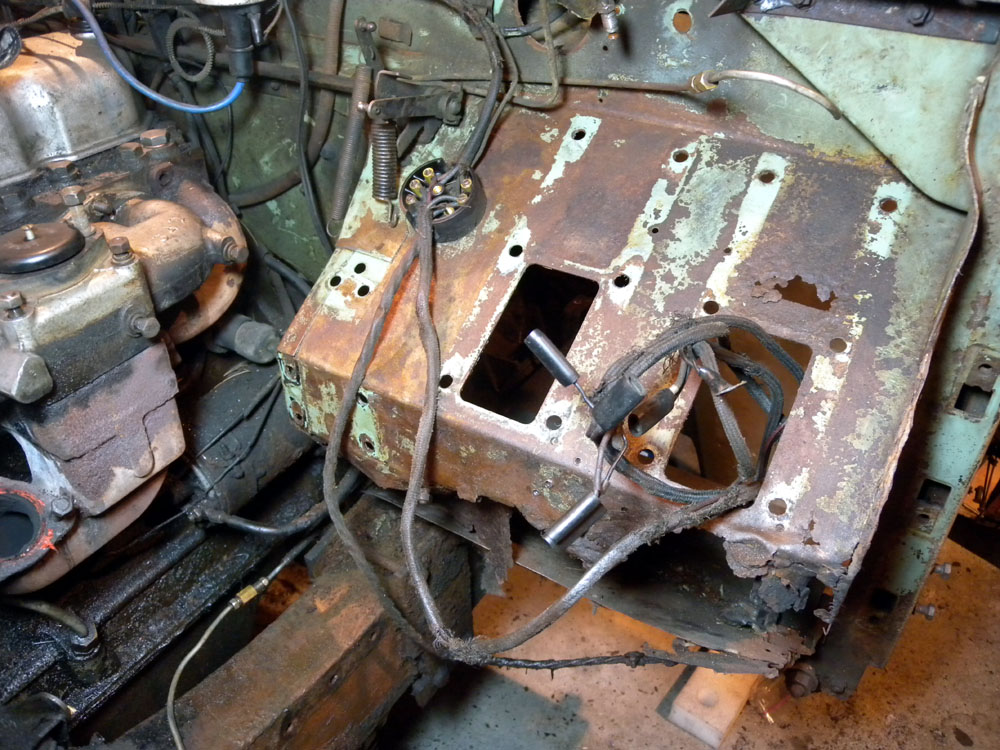
How many holes are there in a bulkhead? Well, once everything is off, it turns out there are quite a few. Apologies for the blurry photo, but is was dark.
After 51 years of service, the old nut locking plates on the swivel hub control arms were finally replaced with the new ones, and that's that done.
A view of the front end, about to receive the brakes; then the hubs will be installed along with the drums.
Just a few of the things liberated from behind the instrument panels. Nothing of value unfortunately!
How many holes are there in a bulkhead? Well, once everything is off, it turns out there are quite a few. Apologies for the blurry photo, but is was dark.
After 51 years of service, the old nut locking plates on the swivel hub control arms were finally replaced with the new ones, and that's that done.
Monday, March 21, 2011
Stripping Old Bulkhead Continues
Continued taking items off of the old bulkhead this evening, tonight being the turn of the steering column and box, along with the accelerator pedal and linkages.
A couple of views of the round junction box:
An overall view of things as they stand now. Remains of the old electrical loom may stay until the new bulkhead is installed and wired up, as the new loom that will be installed does not have the wires for the turn signals, and I'll need to know how to hook them up.
Engine looking a little more exposed. At lower left is what I believe is the original single pulley for the generator, which was removed so that a double could also power the hydraulic snowplow arm. It was wedged between the bulkhead and chassis, at lower right. Tried to get the exhaust and inlet manifolds off tonight, but each has one very seized/rust corroded bolt in a very awkward spot that will take some thought. Note the gooseneck exhaust manifold, which will be replaced with a standard later version, as it goes straight down and will match up with the new exhaust pipes. Would like to get the engine off soon.
A quick view of the auxiliary panel and the hand throttle. I have a replacement starter button, so I hope the original doesn't turn up somewhere! The two rusty items protruding downwards are actually large nails trapped in the bulkhead. Wouldn't want to have swung a foot or knee up onto those. They'll come out when the bullets come out. The black goop on the bulkhead is the adhesive for the insulation that used to be there.
A couple of views of the round junction box:
An overall view of things as they stand now. Remains of the old electrical loom may stay until the new bulkhead is installed and wired up, as the new loom that will be installed does not have the wires for the turn signals, and I'll need to know how to hook them up.
Engine looking a little more exposed. At lower left is what I believe is the original single pulley for the generator, which was removed so that a double could also power the hydraulic snowplow arm. It was wedged between the bulkhead and chassis, at lower right. Tried to get the exhaust and inlet manifolds off tonight, but each has one very seized/rust corroded bolt in a very awkward spot that will take some thought. Note the gooseneck exhaust manifold, which will be replaced with a standard later version, as it goes straight down and will match up with the new exhaust pipes. Would like to get the engine off soon.
A quick view of the auxiliary panel and the hand throttle. I have a replacement starter button, so I hope the original doesn't turn up somewhere! The two rusty items protruding downwards are actually large nails trapped in the bulkhead. Wouldn't want to have swung a foot or knee up onto those. They'll come out when the bullets come out. The black goop on the bulkhead is the adhesive for the insulation that used to be there.
Sunday, March 20, 2011
Steering Parts; Instruments
Thanks to a tip from a gentleman and fellow Series 2 restorer named Lars, the top steering arm bolt on the steering relay has now been reversed - as Lars discovered, in this direction it's easier to remove the bolt in the direction of the 'breakfast', if necessary. No radiator in the way. On RHD cars the bolts is the way it was originally (and would have drawn out towards the front), but when making a LHD vehicle, the factory just turned the unit around as they moved the relay from one side of the chassis to the other.
As the new bulkhead is getting closer, tonight it was the turn of some of the steering coumn parts to come off the old bulkhead for their turn at restoration. Note the condition of the rubber seal for the steering column - the exposed portion hasn't stood the test of time too well! A nice new replacement is waiting....
The steering column itself, including the steering box, is next on the list. All the bolts are loosened, but ran out of time tonight.
Just a couple more views of the rear of the main instrument panel. Nice untouched Pastel Green paint back there, as well.
As the new bulkhead is getting closer, tonight it was the turn of some of the steering coumn parts to come off the old bulkhead for their turn at restoration. Note the condition of the rubber seal for the steering column - the exposed portion hasn't stood the test of time too well! A nice new replacement is waiting....
The steering column itself, including the steering box, is next on the list. All the bolts are loosened, but ran out of time tonight.
Just a couple more views of the rear of the main instrument panel. Nice untouched Pastel Green paint back there, as well.
Subscribe to:
Posts (Atom)