Search This Blog

Tuesday, December 6, 2011

More History Revealed

This past year or so, I had wondered about the history of the Land Rover from 1960 to 1972, the latter being the year the previous owner bought the vehicle. The gov't licencing office wouldn't give any info. Well, today I was stripping the gold paint from the galvanized rain gutter that runs around the roof, and had a light positioned right above the roof, perpendicular to the roof sides. At that angle, all of a sudden it was possible to see very faint hand painted letters beneath the gold paint. In a year and a half of ownership and some pretty close attention, I had never seen these before.

(Seen here after some further sanding)

And so, some careful lighting and pencil work later, the results were revealed, illustrated here in correct size and placement with the aid of Photoshop:


Killaloe, Ontario, is a village just 30 km south of Pembroke, Ontario. Pembroke is where I purchased the Land Rover.

I've also added the losenge-shape of the decal on the door. The underlying photo is from when the Land Rover arrived here, before restoration work began.

A search of the web revealed this surprisingly complete history, along with photos of the owners, including why the Land Rover was sold on in 1972:


What is even more surprising, is that the Keetch family, from whom Hayward and Littlejohn originally bought the business from in 1953, became the second owners of the Land Rover when Hayward and Littlejohn sold the business in 1972!

By virtue of having Mr. Keetch's residential address when he was still alive (Mr. Keetch passed away in 2007), plus the above information, it has also now been possible (thanks to Google Maps) to track down the service garage where the Land Rover was based during its first 12 years, and the short distance away it resided in the following years as well. It so happens that Mr. Keetch lived right next door to the business - and so, the Land Rover was based in this spot, and a few feet down the road, from the time of its initial purchase in 1960, through to 1989. From 1972 to 1983 the Land Rover was used for snow plowing on the Keetch property in the winter, and to go to the Keetch hunting camp in the Fall (which may explain the bullets and fish hooks found during the restoration), and so did not accumulate many road miles. From 1983 to 1989, the Land Rover sat abandoned on the Keetch property. In 1989, the son in law acquired it for his own snowplow use on his own property, his home being some 40 km kilometres away in the direction of Pembroke, but without putting the vehicle in his name or having the vehicle licenced for the road again (which is why I had to purchase the vehicle from the Keetch estate), and it was also at this time that the Land Rover acquired its gold paint.

That the Land Rover was owned by a service station, and after that by someone who may have been the service station owner previously, may be an idication of why this half-century-old Land Rover was in fairly reasonable shape, all things considered, when it was acquired here.

That there is a truck with the exact type of snowplow as came with the Land Rover, was just one more interesting surprise.


Nice to have discovered! Knowing who owned the Land Rover and where the vehicle was for most of its life in Canada is a nice addition to the project.

Thursday, December 1, 2011

Roof Roundup

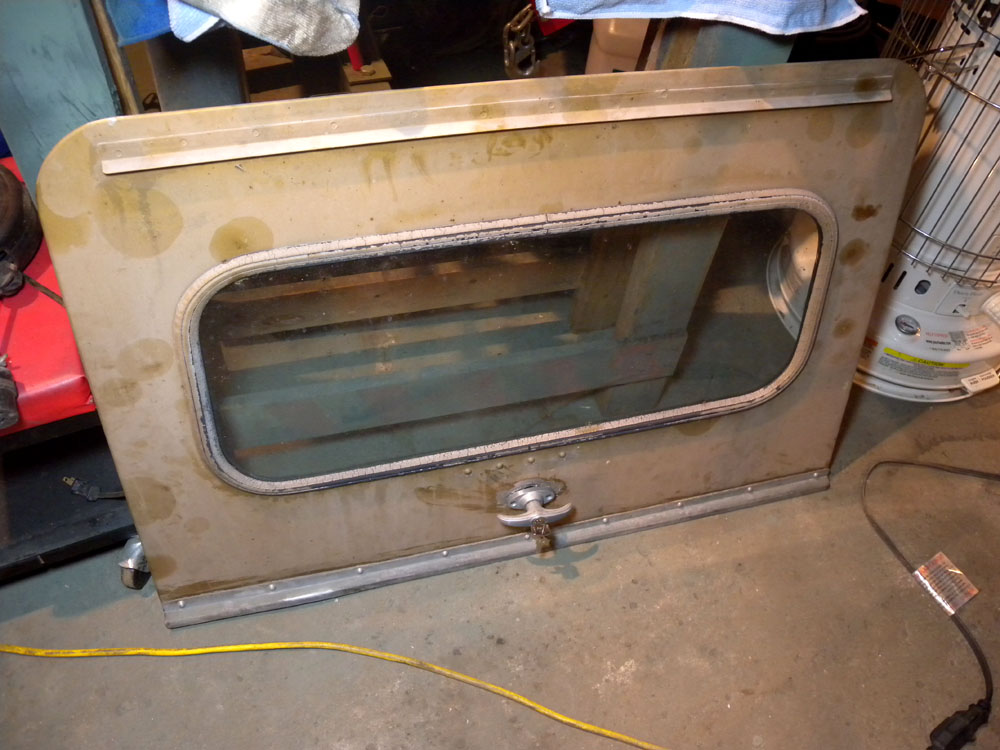
Took the covers off of the roof today, in preparation for starting work. Like the rest of the Land Rover, it's battered and bruised but still in surprisingly good shape overall.

Below, the roof top in its faded gold paint, after a light rub down. Paint is chipping here and there, but nothing too serious. The holes in the center stiffener are from where a yellow flashing light was previously mounted (as told by the previous owner). There are very few dents, one being on the left above the door, the other being a long-ish one at lower left, where it looks as if someone dropped a heavy chain onto the Birmabright.


The window seals are in pretty bad shape. I'm hoping they may sand down to a good finish, as other rubber parts have, but I have the feeling these will end up replaced as they are very cracked and are even missing small bits here and there.

The interior is in great shape. I'm hoping it will clean up nicely, as I'd like to keep the original paint. The only repair needed in there is two rivets missing at the top of the right-hand 'cat flap' hinge bracket.

The insulation that will be hidden under the headliner. It had been coming off, but has now been re-glued. It will stay, but I may spray it with something in order to keep it from shedding quantities of particles when disturbed.

The 'cat flap', sporting what will be its new door handle when finally affixed. Some surface rust on the steel frame, needs a new window seal, and the fastening rods need straightening, but otherwise in good shape. Once those are taken care of, it will regain its original Limestone colour, as will the roof.

Monday, November 28, 2011

Things Left to Do

The list of things to do is getting shorter. The hood/bonnet is now on 'permanently' (although the driver's side wing is not). This list will probably turn out to be incomplete, but, as of today, this is what I think remains to be done:

1. Brake and clutch bleed (followed by 'permanent' attachment of left-side wing, once access to the m/c's isn't so important);

2. Seatbelts;

3. Wheel alignment

4. Hood "rub strip" on the 'breakfast'.

5. Oil into the differentials and swivel hubs, including new plug washers;

6. Wing mirrors;

7. Replace flasher module in dash, as it has decided not to work;

and last but not least:

8. Roof.

In the sub-category of  'Roof' , a somewhat large job:

1. Sand and re-paint;

2. Replace window seals if necessary;

3. Repair catflap hinge and handle;

4. Repair headliner and 'eyebrow' headliners;

5. Install seatbelt brackets.

6. Rearview mirror restored and installed.

Barring anything going wrong or something new showing up, I think that's it. We'll see.


Saturday, November 26, 2011

Engine Sound Video

Not the best video you'll ever see or hear, but due to popular request, here's the Land Rover in action.

Thursday, November 24, 2011

Engine Test

No photos from testing this evening, as I was more focussed on the engine. Steve adjusted the accelerator linkages, tightened a few things, and we started her up. Started almost instantly. A shut down followed for a few more adjustments to the linkages so that the engine could idle correctly, and we let her run again. Soon, Steve noticed some coolant gathering at the front of the head, where it meets the block, and thought the head gasket may need replacing. A closer inspection revealed it was just the water temperature sensor bolt that was not sufficiently tightened, allowing coolant to pass.

The engine was allowed to warm up fully, and all temps and pressures were normal. A bit of exhaust blowing near the manifold was quickly solved with the tightening of the bolts around the base of the carburator that hold the intake and exhaust manifolds together. After that, the engine just ran and ran without any further problems. Even got some nice heat out of the Kodiak heater.

Steve's summation is that the engine and ancilliaries "run like new", and was truly and pleasantly surprised at how good a condition everything appears to be in. It runs like the proverbial sowing machine (touch wood), and is an absolute pleasure to listen to.

Next step will be the to bleed the brake and clutch.

Below, just some photos after tonight's work. Another major part of the project complete. Note the exhaust manifold just beginning to discolour! Green tape of the side of the radiator panel is just to protect the paint until the wing is attached 'permanently'.


And how it appeared when it arrived here, on the old chassis and with the side-exit exhaust. The side-exit would be correct for this year and model of Land Rover. The present exaust is the later 'straight down' type for simplicity and reliability's sake and because of the unavailability of the correct exhaust pieces. I've kept the original 'swan-necked' exhaust manifold in case it's ever decided to put the original exhaust configuration back on.

Wednesday, November 23, 2011

Odds and Ends

While waiting for Steve's next visit tomorrow, have installed the new oil filter seal, which arrived today. Ran the engine for a short while a couple of times to see if all's well, and the result is no more leak.And with that solved for now, have busied myself with some other tasks which need to be done.

Below, the left-hand ABS outer wing has been attached properly to the inner wing (although not firmly attached to the bulkhead yet). A nice fit, and a very good quality part. Dent resistant, too! Had to stretch the top holes just a little to get the best fit, but given what has to be done so often with other parts, this is just par for the course. I would still recommend the plastic outer wings to anyone, if originals aren't available. The wing itself will come back off when Steve is back tomorrow, as it makes working on the engine much easier. Also attached are the wing mirror brackets, mainly just to stop me putting stuff on the wings that may cause scratches, and to give something to hold on to when manouvering the wings in the tight spaces of the garage. The hub caps are also on. Took a while to find some that looked like those on the original Land Rovers when new.

Not original, but more of a 'common sense' thing to add: tow rings. Apron has also been properly attached.

Waiting for Steve's return, so the timing and carb tuning can be done. All major parts and assemblies are original. Orange box on the radiator panel is the battery charger/maintainer. You can just make out the top of the radiator fan shroud, which I haven't seen installed on too many Land Rovers. Fits very nicely, and also goes a little ways to stabilising the radiator assembly when a wing is off, as there is a bracing bracket that attaches to the battery support stand.


Slightly better view to better show the bracing bracket:

Winter is back, as the view out the rear window this morning shows. It was much nicer when the garage was warm! Have bought a large kerosene heater, and so with luck the garage will be easier to work in this winter.

Friday, November 18, 2011

Started

... And it started quickly, with almost no smoke. Nice! We let it run for a minute, and then noticed that the seal on the oil filter canister (an old seal) had failed and there was oil leaking all over the ground, and so things will have to wait now until a new seal is here. And so, the run was a bit short, which is why there are no photos or video for now.

Sum total of problems found before starting:

     1. Sediment jar wasn't on the fuel pump firmly enough, and allowed a little air to be sucked in. Not much, but enough to effect fuel flow. Connections were also tightened to ensure as much of vacuum as possible.

     2. Contact on the starter motor was dirty, and had to be cleaned before it would work.

All found and fixed by Steve of Classic Automotive Repair.

Sum total of problems found after starting:

     1. Oil filter canister seal needs replacing. It had looked ok visually, but not in practise! I also hadn't quite realised how much force the oil pressure exerts.

     2. Exhaust downpipe bolts need to be tightened.

With luck these shouldn't take too long to get sorted, and then Steve will be back (hopefully next week) to complete the tuning of the carb and show me how it's done, and check the timing. Also get the brake system bled and checked.

Other good news is that the fuel gauge works well.

Voila. Too bad it couldn't have run longer, but all in all pretty good. Could have had far worse problems. Looking forward to the next session.