Search This Blog

Friday, April 26, 2019

New Wheels and Tires

When the Land Rover was being restored almost a decade ago, the original 1959 wheels were rusted, and in a couple of areas pretty much so. I had them media blasted, and overall they looked good enough to use, but with a fair amount of surface pitting in spots due to the rust. When the tires shop was putting on the tires, they said that in their opinion one of the wheels was not fit for use and should be kept as the spare, and the others were good enough to use but perhaps not forever.

The centers are riveted to the outer rim, and corrosion may have be in there, as well.

After 8 years of driving the Land Rover year round in humid heat and and rain and winter blizzards and everything in between, and now doing faster speeds thanks to the overdrive, the warnings of the tire shop were still in my head and so decided it was time to replace the wheels.

The old ones would be kept for their authenticity, and could be used if at a car show, for instance.

It would also be a good time to replace the tires with more modern tubeless varieties.

To keep the wheels as authentic as possible, these are 16" Defender tubeless set that look like the originals, with the exception of the offset being just a little more away from the chassis. Width is 5.5".

Like most wheels these days, they came in black. I decided to keep them that colour just to make a change, but painted them again for additional protection. Below, seen after painting:


Wheel data stamped into the rim:


Wheel inner shape is pretty much identical to the 1959 ones, with the exception of a small additional ridge which I assume is due to the tubeless design.


Original 1959 wheels. Also visible are the rivets:


Tire size recommendation was 235/85R16, an inch or so greater in diameter than the Super Traxion but that was fine as the Land Rover is using a 109 speedometer and this would perhaps bring the vehicle speed up so that it matched the speedometer with greater precision.

What tire to use? The tubed Super Traxion tires which resemble the tires traditionally seen on a Series have performed extremely well, and so considered tires that resembled them, but in the end decided to let my driving of the past years dictate the new type to use. This has been almost exclusively road use, with minor excursions on gravel roads and the like, with a bumpy field once in a while.

After much research, Michelin Defender LTX M/S (Mud and Snow) were picked. Suitable for most non-extreme off-roading if desired - see here, for example: https://www.autoguide.com/auto-news/2015/09/michelin-defender-ltx-m-s-tire-review.html  - but also excellent for road use, and with an equally good reputation as winter tires. They are apparently fuel efficient, as well.

Tires as they arrived. The tread looks like a road tire, but in person they are 'beefier':


Perhaps useful info:

- Original tire/wheel combination weighed 60 lbs each. New combination come in at 70 lbs each.

- I'd read that newer rims are thicker and stud hole sizes larger, which was the origin of the shorter but wider wheel nuts. But on these wheels, the thickness and hole sizes are identical to the 1959 wheels. The new nuts go onto the old studs without any problem, with two threads extending beyond the end of the nut. As far as I can see, the newer nut design was just an improvement over the old as it presses onto more on the wheel surface. I could have used the old 1960 nuts if desired.

The nuts (also from 3 Brothers) came 'blackened' for rust protection, but have also given them a light coat of linseed oil  (boiled), as this will dry and not be sticky and is a proven 'old-school' protection against rust. We'll see if it works. :)


Having driven the Series with the new wheels and tires for a week now, I can say the ride is definitely smoother, and perhaps just a little quieter. There is less tendency to follow road camber. There appears to be greater sensitivity to left-right brake imbalance if present. The Series seems to be about 5% faster at higher speeds, but will need to test with the GPS to see if the speedometer now matches perfectly with the actual vehicle speed.


Almost same place, but different year, season and wheels. :)


Thursday, April 4, 2019

Radiator Hose Heater Problem

(See original heater installation here)

Nothing serious, but came back from a drive and parked the Series in the garage, and as things were being put away heard the sound of liquid splashing onto the floor. It was quickly visible that the lower coolant hose on the radiator had failed, with a resulting large green pool on the garage floor.

The lower radiator hose had failed where it connected to the in-line heater, at the point where it stretched over the heater flange. There appeared to have been both blistering and cracking. The hose material itself, away from the damage area, was otherwise in great shape.

I could imagine the hose cracking, as the in-hose heater takes away some of the flexibility between the engine and the radiator, and the installation had been there for six years, but I'm not sure what caused the apparent blistering - wear and tear or a different issue. Perhaps six years of wear and tear + heat + time.

Removing the plug insert revealed that the inner surface of the plug had swollen and split at the sockets. I can't be sure whether it was just the six winters of heating etc. that had done this, but either way the unit clearly had to be removed.

For now, the lower radiator hose has been replaced with a stock unmodified one, and will probably leave it like that. Perhaps next winter I'll use a magnetic-type heater, such as I use occasionally on the underside of the oil pan on really cold days.

Below, the assembly as removed. Had to cut the top hose as it had firmly welded itself to the water pump casting:


The blistering. Or could it be wear from being a vibration point stretched over the heater flange?


The inside of the heater plug:


Saturday, November 10, 2018

Discovery Sale

After six years or so of happy commuting, my wife decided to sell her 2001 Discovery 2, worried that it was getting too old and would require too much work in the future. Sold with a reluctance, as there wasn't much wrong with it, the vehicle was great year 'round and in the worst winter weather, and the waves from other Land Rover owners made her feel a part of a club, but the decision was made.

Well, the first prospective purchaser (a car enthusiast) to test drive the Discovery liked it so much, he bought it - and liked it so much he didn't even negotiate the asking price. Until this week, he'd never even really heard of Land Rovers, and had just entered "all wheel drive" in the search box, which turned up Discovery's as a candidate. Saw our ad, liked what he saw, did the research to learn more about the type - and once behind the wheel absolutely loved it.

Nice to see that seventeen year old Land Rovers can still do a remarkable job seducing people. I wish modern cars had that.

Sad to see her go, it was fun.


Wednesday, August 29, 2018

Another in the Neighbourhood

Recently met Mike M. who has kindly sent some photographs of his 1961 Series, at the very beginning of its restoration. Nice straight body panels and relatively un-modified. I think Mike said it was eventually going to be finished in a Sand colour. Should be a good looking vehicle when done!


Monday, August 6, 2018

Exmoor Trim Seat Belt Bar

(Note: If things change, this blog entry will be updated.)

Having decided to take the roof off this summer, it became necessary to install a seat belt bar so that the seat belts would continue to go over the shoulders correctly. At the beginning of July one was ordered, by Exmoor Trim. This one here: https://www.exmoortrim.co.uk/soft-top-front-seat-belt-bar.html

The seat belt bar arrived quickly, but very soon turned into a serious disappointment (and as of writing continues to be). If this was supposed to fit on a Series 2, then someone had never seen one, or at the very least not used a jig. And this for over $400 CDN.

In a nutshell, here are the problems:

1) Assuming the holes at the end of the diagonals at rear are somewhat accurately located, then the end plates at the forward end are too long, and overlap the raised holes for the hood sticks.

In the photo below, almost 1/4 of an inch of the forward edge of the plate has been ground off, but it still overlaps the welding. To grind off more would, I believe, leave the holes too near the edge. (In the photos below, I've replaced the bolts and washers with my own)


2) The holes in the end plates are huge (and apparently made with a dull drill bit, given that they're not round). The whole head of the supplied bolts can go through. This may have been done on purpose to give some "wiggle room", but this means that washers will have to take the full brunt of holding the bar down.


3) The end plates aren't parallel. The one on the right-hand side is twisted. Not a big deal, perhaps, but how much effort would it have taken to make it exactly parallel?


4) The end plate on the left is "u" shaped, i.e. it doesn't lie flat on the capping. The forward end goes up by about 1/8 inch. (I managed to bend it down, but then the end plate became S shaped, as the tube end/weld isn't parallel to the capping.)


5) The diagonal bars end up 1" away from the inner capping surface, on both sides.

The end holes in the diagonal bar also end up significantly out of alignment with the existing slots in the capping, the holes being too far rearwards for the existing slots to accommodate them, which means that using a bracing plate inside the capping becomes problematic.


7) Paint was applied over dirt or rust, as can be seen in the photos above. A light scratching with a fingernail on the effected areas and the paint came off easily.

The whole thing can be forced roughly into place (used "C" clamps to experiment), but under tremendous pressure - but THEN the cross bar bows alarmingly rearwards and now doesn't meet up in the middle. If that can somehow be pushed forwards to (perhaps) meet up, then something is going to break. I've tried to bend things slightly but these tubes are strong and while they will flex they don't give (under the pressure I can exert).

3 Brothers was contacted, with the above info, and they indicated they had forwarded this to Exmoor Trim. A month after this, no further word from Exmoor Trim.

The next step was to contact BGM Metalworks. They did a great job welding the door frames. I took the Land  Rover over to them, and they indicated that they could fix the bar (for about $200) and even kindly gave me some metal stock with which to fabricate new base plates to be used. The plates were made, and I called them up (on a Thursday), was told that they would get back to me to set up an appointment either the next day or Monday "at the latest." That was also a month ago. I called back a week afterwards just to make sure things hadn't accidentally slipped under the radar, so to speak, was told they would call back, and still nothing. They may be busy, but it would certainly help to contact a customer to say so.

One of the new base plates:


That's where things are as of the date of posting this. This entry will be updated as soon as there are further developments.

_______________________________


The seat belt bar is now sufficiently but very temporarily attached, enough to be used, although I think it's safest to use it on slow roads only. Assuming the problems are fixed then further drives with the top off will be very enjoyable.


Sunday, June 24, 2018

OVLR Birthday Party

A nice day of Land Rovering yesterday, near Maberly, Ontario, with friend Tony (who is restoring the 1962 88") and the Ottawa Valley Land Rover Club. First time I've driven my Land Rover 200+ km in a day, which it did noisily but without a problem, even at 95 km/h. Great time.

Even managed to hitch a ride for some off-roading with a great guy named Kurt and his Defender 130 (purchased sight-unseen from France) for some off-roading on some seldom used trails, which turned out to be a bit too rough (as ever, photos don't properly show what it was actually like, with vehicles getting stuck and chainsaws needed to clear fallen trees) to risk my semi-retired (and unscratched!) Landy on. :)

Stopping for coffee in Westport on the way.

Friend Tony waits for the other Land Rovers to show up.

Great looking Defender 110.

Our mount for the ride, still sporting its French front license plate.

Rocks, rocks and more rocks.

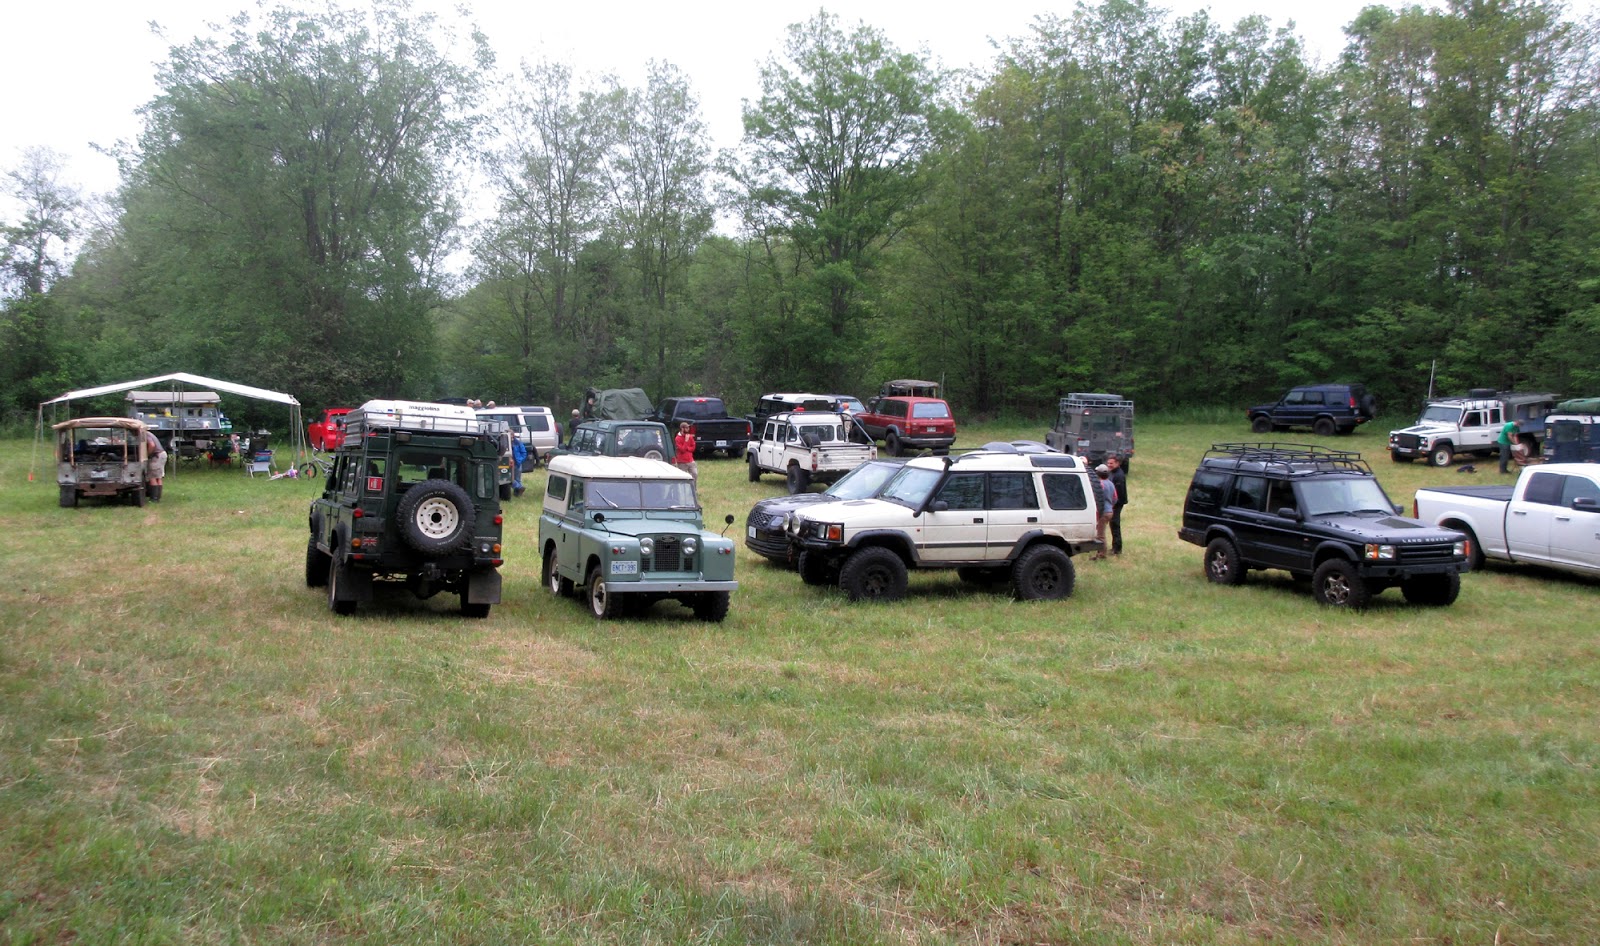
Some 17 Land Rovers of all types. More were at the National Park camp site and in the adjacent field. More Land Rovers than I've ever seen at one time. :)

Monday, June 4, 2018

Spring

Not too much to report, other than have been enjoying the Series in the warmer weather.


And, on other fronts, my friend Tony's 1962 is making progress. The picture below is actually out of date, being a few weeks old, when we test fitted the bulkhead. This weekend a group of us (optimistically called L-RoCK - Land Rover Club of Kingston) went over and helped install the leaf springs, get the axles in place, installed the bump stops, and get the differential drive shaft seal replacements started . A nice way to spend a few hours, and thanks for the beer and sandwiches!