... And it started quickly, with almost no smoke. Nice! We let it run for a minute, and then noticed that the seal on the oil filter canister (an old seal) had failed and there was oil leaking all over the ground, and so things will have to wait now until a new seal is here. And so, the run was a bit short, which is why there are no photos or video for now.
Sum total of problems found before starting:
1. Sediment jar wasn't on the fuel pump firmly enough, and allowed a little air to be sucked in. Not much, but enough to effect fuel flow. Connections were also tightened to ensure as much of vacuum as possible.
2. Contact on the starter motor was dirty, and had to be cleaned before it would work.
All found and fixed by Steve of Classic Automotive Repair.
Sum total of problems found after starting:
1. Oil filter canister seal needs replacing. It had looked ok visually, but not in practise! I also hadn't quite realised how much force the oil pressure exerts.
2. Exhaust downpipe bolts need to be tightened.
With luck these shouldn't take too long to get sorted, and then Steve will be back (hopefully next week) to complete the tuning of the carb and show me how it's done, and check the timing. Also get the brake system bled and checked.
Other good news is that the fuel gauge works well.
Voila. Too bad it couldn't have run longer, but all in all pretty good. Could have had far worse problems. Looking forward to the next session.
Friday, November 18, 2011

Mudguards and Kodiak Duct
Finished up the mudguards and Kodia intake duct, except for a couple of minor things which need to wait. The mudguards were a little more challenging than I thought, as I had assumed they were a part of the wing, whereas they must be removed before a wing can be taken off, as they block access to the bulkhead/wing spire nuts. The original mudguards had rusted completely away, and the manuals don't offer any help, so I came up with what I think is a logical system. Once the mudguards were done, the supports for the Kodia intake duct could be done.
Below, an overall view of the Kodiak duct in place. The original duct brackets were rusted to oblivion. The new brackets use the original mounting points. For the rear support, a portion of rear axle safety strap was used, as it it's both extremely strong and flexible and therefore shouldn't crack, shouldn't chafe the duct too much, and is designed to live in a wheel well in any case, and so should easily put up with rocks, water, etc., thrown up by the tire. For the forward bracket, a metal strap was used, as I felt the duct should be more rigidly in place so as to not put undue strain on the wing intake flange and it's relatively soft aluminum wing skin. If this metal strap ends up cracking, then another axle strap can be used. The tire shouldn't hit the duct except in perhaps the most extreme situations, as the distance to the duct is greater than the distance from the axle top to the bump stop on the chassis.


The mudguard, with the rebuilt wing mudguard support bracket peeking over the top. The original brackets up there had corroded significantly, and looked as if they may not be strong enough for too much stress over the long term, and so I sandwiched them between two supporting aluminum plates (aluminum to reduce risk of further dissimilar metal corrosion on the original brackets) which are rivetted on. Holes were drilled in these to take spire nuts, so that the mudguards can be easily removed.

Rear of the mudguard new support brackets.

Driver's side mudguard, with removeable steering box cover. A spire nut was used at the top of the steering box cover, and the bottom attaches via a bolt (not visible here) just like the mudguard. I'm not sure yet what to do about attaching the mudguard and steering box guard to the inner wing, and so have not drilled any holes. I'll wait until the outer wing panel is on, in any case, as there's always a fair amount of flex in all these parts and it's naturally important that the holes continuet to line up! The large hole in the wing is where the original exhaust pipe came through. This may just get taped up, as I don't want to do anything permanent in case the desire to put the original-type exhaust system comes up. I've kept the original swan-necked exhaust manifold, just in case.

Below, an overall view of the Kodiak duct in place. The original duct brackets were rusted to oblivion. The new brackets use the original mounting points. For the rear support, a portion of rear axle safety strap was used, as it it's both extremely strong and flexible and therefore shouldn't crack, shouldn't chafe the duct too much, and is designed to live in a wheel well in any case, and so should easily put up with rocks, water, etc., thrown up by the tire. For the forward bracket, a metal strap was used, as I felt the duct should be more rigidly in place so as to not put undue strain on the wing intake flange and it's relatively soft aluminum wing skin. If this metal strap ends up cracking, then another axle strap can be used. The tire shouldn't hit the duct except in perhaps the most extreme situations, as the distance to the duct is greater than the distance from the axle top to the bump stop on the chassis.


The mudguard, with the rebuilt wing mudguard support bracket peeking over the top. The original brackets up there had corroded significantly, and looked as if they may not be strong enough for too much stress over the long term, and so I sandwiched them between two supporting aluminum plates (aluminum to reduce risk of further dissimilar metal corrosion on the original brackets) which are rivetted on. Holes were drilled in these to take spire nuts, so that the mudguards can be easily removed.

Rear of the mudguard new support brackets.

Driver's side mudguard, with removeable steering box cover. A spire nut was used at the top of the steering box cover, and the bottom attaches via a bolt (not visible here) just like the mudguard. I'm not sure yet what to do about attaching the mudguard and steering box guard to the inner wing, and so have not drilled any holes. I'll wait until the outer wing panel is on, in any case, as there's always a fair amount of flex in all these parts and it's naturally important that the holes continuet to line up! The large hole in the wing is where the original exhaust pipe came through. This may just get taped up, as I don't want to do anything permanent in case the desire to put the original-type exhaust system comes up. I've kept the original swan-necked exhaust manifold, just in case.

Thursday, November 17, 2011
Getting Ready
Tomorrow, Steve Hayes, a specialist in British automobiles (website here), will be over in late afternoon to see if we can start up the Land Rover. And so, today's Land Rover time was just making sure everything is in order as much as possible. The antifreeze is in, new spark plugs ready, battery fully charged, etc.. Also put the oil in the gearbox and transfer box for the first time. Tomorrow I'll put the fuel in the tank, and if time permits, oil in the differentials and swivel pin housings. If startup goes well, and Steve has the time, with luck the brakes can be bled tomorrow as well. We'll have to see how it goes.
Always fun working in the dark, seeing if the lights work. : )

Rear stop light, looking yellow due to the camera, and the licence plate light.

Front side and turn signal lights. They've weathered their 51 years quite well. The rubber even came back to pretty good shape after gently sanding off the dried/cracked surface layer.

Good thing my daughter's not grown up, or I think that once the Land Rover is running, Dad would be looking at it driving off into the distance. My daughter took the portable light and did a tour underneith, and asked a million questions about what things were what and what does this do. Second time she's done that....

Always fun working in the dark, seeing if the lights work. : )

Rear stop light, looking yellow due to the camera, and the licence plate light.

Front side and turn signal lights. They've weathered their 51 years quite well. The rubber even came back to pretty good shape after gently sanding off the dried/cracked surface layer.

Good thing my daughter's not grown up, or I think that once the Land Rover is running, Dad would be looking at it driving off into the distance. My daughter took the portable light and did a tour underneith, and asked a million questions about what things were what and what does this do. Second time she's done that....

Monday, November 14, 2011
Electrics
Hooked up the battery today, for the first time in over a year, and first time with the new wiring loom. Haven't done the front wings or headlights yet, but everything else that was hooked up worked, including tail lights! Nice to see!
A little overexposed, but at least you can see what lights up. I was so caught up with running the Kodiak, tooting the horn, running the fan, listening to the windshield wipers motors and looking at the lights that I almost ran the battery down.

With today's work, the passenger/driver area is basically complete, just needing the seatbelts. The tub, with all its fittings including taillights, is also complete. More things will probably show up that need doing once the roof is on, but for now, that's that. In the future, I plan to add the insulation panels, but not right now.

The two-speed Casco fan, above the speedometer. These date from the 30's, 40's and 50's, from what I've found on the web, and was primarily used by American car manufacturers. This is having a long useful life in a Land Rover - after whatever car it was in before. : )

Added the air filter, hose (still needs clamps) and intake bracket, plus purchased new hoses for the Kodiak heater after the old showed some serious cracking in one spot. A few things left to do, and then it's start up time. The last major thing to do here at this stage is to finish the lighting wiring, build the mudguard support brackets, and then assemble and attach the wings. Coolant may go in the radiator tomorrow. Brake fluid is also here, and is standing by.

A little overexposed, but at least you can see what lights up. I was so caught up with running the Kodiak, tooting the horn, running the fan, listening to the windshield wipers motors and looking at the lights that I almost ran the battery down.

With today's work, the passenger/driver area is basically complete, just needing the seatbelts. The tub, with all its fittings including taillights, is also complete. More things will probably show up that need doing once the roof is on, but for now, that's that. In the future, I plan to add the insulation panels, but not right now.

The two-speed Casco fan, above the speedometer. These date from the 30's, 40's and 50's, from what I've found on the web, and was primarily used by American car manufacturers. This is having a long useful life in a Land Rover - after whatever car it was in before. : )

Added the air filter, hose (still needs clamps) and intake bracket, plus purchased new hoses for the Kodiak heater after the old showed some serious cracking in one spot. A few things left to do, and then it's start up time. The last major thing to do here at this stage is to finish the lighting wiring, build the mudguard support brackets, and then assemble and attach the wings. Coolant may go in the radiator tomorrow. Brake fluid is also here, and is standing by.

Friday, November 11, 2011
Instrument Panel
The instrument panel wiring is complete, thanks to the arrival of the bullet connectors, and so have been able to close things up. Still a few minor things to do next week, but for now it's nice to see. I just hope everything works when it has power through it!
In this view central panel, looking a bit better than when it first arrived here over a year ago. Everything is original (including the screws), except for the green warning light cover on the flasher panel, and the new plug in the two inspection light sockets, which will hold the wires from the Casco 'air conditioning' fan when it returns from refurbishment at 3 Bros.. The extra screw at top right is one of the screws that hold the fan to the dash. The yellow dome light pull-knob has been fixed and now works - and have purchased a dome light for when the roof is back on. Gear shift knob has been left in its original condition (as with the other knobs).

Kodiak Mk.II-specific demister vents are also in place. I had to remove a small part of a flange on the forward face of each vent to get them to fit around the fresh-air vent controls, but now they fit perfectly. Still a few things left to do here and there, like a blanking grommet for the clutch slave cylinder inspection hole.

And finally, just an overall view. I hope everything works, and it will be very nice to get in there when all is done, and actually drive!


In this view central panel, looking a bit better than when it first arrived here over a year ago. Everything is original (including the screws), except for the green warning light cover on the flasher panel, and the new plug in the two inspection light sockets, which will hold the wires from the Casco 'air conditioning' fan when it returns from refurbishment at 3 Bros.. The extra screw at top right is one of the screws that hold the fan to the dash. The yellow dome light pull-knob has been fixed and now works - and have purchased a dome light for when the roof is back on. Gear shift knob has been left in its original condition (as with the other knobs).

Kodiak Mk.II-specific demister vents are also in place. I had to remove a small part of a flange on the forward face of each vent to get them to fit around the fresh-air vent controls, but now they fit perfectly. Still a few things left to do here and there, like a blanking grommet for the clutch slave cylinder inspection hole.

And finally, just an overall view. I hope everything works, and it will be very nice to get in there when all is done, and actually drive!

Tuesday, November 8, 2011
More Ducting
One major part done today, and that's the mudguard with the hole in it for the heater duct. First scraped a deep groove using a special tool, and then patiently drilled holes all around, followed by snipping with my shears. Cutting steel that is almost 1/16" thick with hand shears will improve your handshake. : )
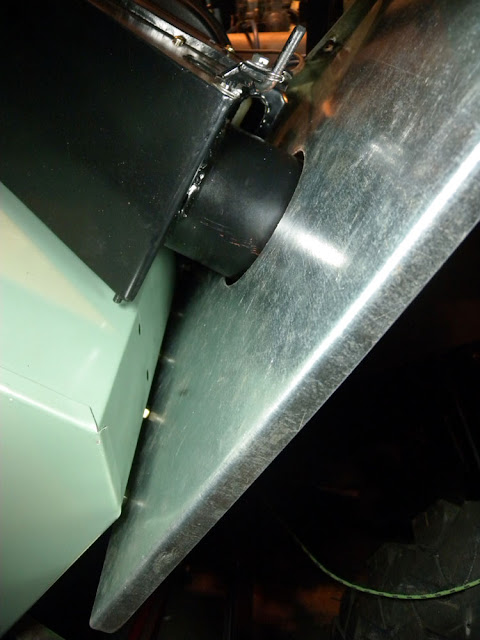
In this view, the mudguard test fitted, with the hole cut and Kodiak intake poking through. The bottom of the mudguard has been moved away from the footwell with an extra nut, as I have heard from several sources that dirt and moisture collected at the contact area is one of the primary starters of rust on a Land Rover bulkhead. The extra space will let the area drain. The duct hole will probably let in extra dirt, etc., too. A side benefit of the extra nut is that the mudguard can be removed without having to have something/someone hold the bolt inside the footwell.
View from the other side. Aso had to modify the flanges at right to fit correctly within the wing. Mudguard can now be painted.

The tools that did the job. The resulting piece of mudguard looks like a saw blade, and is probably as sharp. A file was used to smooth the hole.

Duct being test fitted. Some sort of edge protector will be needed around the hole to prevent wear on the duct. Bolt with large washer at upper right is one of the mounting points for the duct supports, which have yet to be made.

Did a very loose test fitting of the outer wing, just to make sure there were no clearance issues with the mudguard.

And while the wing is on, why not a shot of the overall project, as it is now? : ) The hood/bonnet is leaning against the back, and the roof is out of sight to the right. In a way it's too bad about the wrinkled rear panel, but hey, at least I'll have a Land Rover to drive! And the rear panel shouldn't stand out too badly once all is done, as evidenced by the bottom-most photo, which is of the Land Rover as she was when newly arrived.

Front panels, sills, etc., looked a lot worse back then...not to mention everything else underneath that Birmabright skin. Rear panel has actually been straightened quite a bit since then, as has the rear corner capping.

In this view, the mudguard test fitted, with the hole cut and Kodiak intake poking through. The bottom of the mudguard has been moved away from the footwell with an extra nut, as I have heard from several sources that dirt and moisture collected at the contact area is one of the primary starters of rust on a Land Rover bulkhead. The extra space will let the area drain. The duct hole will probably let in extra dirt, etc., too. A side benefit of the extra nut is that the mudguard can be removed without having to have something/someone hold the bolt inside the footwell.

View from the other side. Aso had to modify the flanges at right to fit correctly within the wing. Mudguard can now be painted.

The tools that did the job. The resulting piece of mudguard looks like a saw blade, and is probably as sharp. A file was used to smooth the hole.

Duct being test fitted. Some sort of edge protector will be needed around the hole to prevent wear on the duct. Bolt with large washer at upper right is one of the mounting points for the duct supports, which have yet to be made.

Did a very loose test fitting of the outer wing, just to make sure there were no clearance issues with the mudguard.

And while the wing is on, why not a shot of the overall project, as it is now? : ) The hood/bonnet is leaning against the back, and the roof is out of sight to the right. In a way it's too bad about the wrinkled rear panel, but hey, at least I'll have a Land Rover to drive! And the rear panel shouldn't stand out too badly once all is done, as evidenced by the bottom-most photo, which is of the Land Rover as she was when newly arrived.

Front panels, sills, etc., looked a lot worse back then...not to mention everything else underneath that Birmabright skin. Rear panel has actually been straightened quite a bit since then, as has the rear corner capping.

Monday, November 7, 2011
Ducting
Well, things are drifting in, the only parts really missing now are the wire bullet connectors and crimper, from British Wiring. Without the wiring complete, the heater hoses can't be connected, and the final connections need to be made behind the instrument panel before it can be closed up.
The high-quality 4" dia. heater intake ducting and 1 1/4" demister ducting arrived, from Aircraft Spruce Canada, as did some aluminum sheeting to rebuild the mudguard bracket in the wings. There are now just some battery terminals to come from them.
Once the above is taken care of, unless something else gets in the way, it will be time to start the old girl up!
Below: Most wiring done, including for the turn signal/indicator panel (although it's not attached). Demisting ducting in place. Have to modify the demister vents a little before they're installed, as they were designed for the flat, turn-knob vent openers, not the curved ones here. I had wondered why they didn't fit properly when I first had the vehicle. If you look veeery carefully, you can see that the horn button is now installed, too. White box on the dash contains the new dashboard plugs for the fan presently being refurbished by Peter at 3 Bros.; black object beside that is the Tiny-Tach that will help understand the engine a little more - still don't know where it will go.

The 4" ducting for the heater intake, still in its protective wrap, waiting to be trimmed. Brackets have to be made to hold it to the inside of the wing, as on the original. As well, a hole has to be cut into the mudguard to allow the duct through. Mudguard is under the duct, in this picture.

The complete heat distributor. The wire handle at left allows air to be directed either up to the demisters, down towards the driver's footwell, or a mixture of both. Door at right allows the passenger to regulate how much air is directed to their footwell. I'll need to source the paint that was used on the distributor, as handling and fitting has caused some small chipping.

Just the aluminum sheets, of different thicknesses, to rebuild the mudguard support brackets in the wings plus make the wing duct support brackets/straps.

Old versus new: The old 1/4" intake grill, left, and the new replacement, at right. The new one is glavanized, so hopefully won't rust quite as badly as the old!

The high-quality 4" dia. heater intake ducting and 1 1/4" demister ducting arrived, from Aircraft Spruce Canada, as did some aluminum sheeting to rebuild the mudguard bracket in the wings. There are now just some battery terminals to come from them.
Once the above is taken care of, unless something else gets in the way, it will be time to start the old girl up!
Below: Most wiring done, including for the turn signal/indicator panel (although it's not attached). Demisting ducting in place. Have to modify the demister vents a little before they're installed, as they were designed for the flat, turn-knob vent openers, not the curved ones here. I had wondered why they didn't fit properly when I first had the vehicle. If you look veeery carefully, you can see that the horn button is now installed, too. White box on the dash contains the new dashboard plugs for the fan presently being refurbished by Peter at 3 Bros.; black object beside that is the Tiny-Tach that will help understand the engine a little more - still don't know where it will go.

The 4" ducting for the heater intake, still in its protective wrap, waiting to be trimmed. Brackets have to be made to hold it to the inside of the wing, as on the original. As well, a hole has to be cut into the mudguard to allow the duct through. Mudguard is under the duct, in this picture.

The complete heat distributor. The wire handle at left allows air to be directed either up to the demisters, down towards the driver's footwell, or a mixture of both. Door at right allows the passenger to regulate how much air is directed to their footwell. I'll need to source the paint that was used on the distributor, as handling and fitting has caused some small chipping.

Just the aluminum sheets, of different thicknesses, to rebuild the mudguard support brackets in the wings plus make the wing duct support brackets/straps.

Old versus new: The old 1/4" intake grill, left, and the new replacement, at right. The new one is glavanized, so hopefully won't rust quite as badly as the old!

Subscribe to:
Posts (Atom)